(This is a recent post I have written in my Blog. Pl. ref. here for the original blog-post)
By
integrating SharePoint with Dynamics CRM, you can leverage the document
management capabilities of SharePoint from within Dynamics CRM. This allows you
to store and manage documents in the context of a Dynamics CRM record on a
SharePoint Server, and leverage the SharePoint infrastructure to share, manage,
and collaborate efficiently.
Integrating CRM and SharePoint
There
are 2 ways of integrating SharePoint with Dynamics CRM; using List
component and server-based integration.
|
SharePoint
version
|
List
component support
|
Server-based
SharePoint integration support
|
|
SharePoint 2013 or SharePoint 2013
SP1
|
Yes
|
No
|
|
SharePoint 2010 SP1 or SP2
|
Yes
|
No
|
|
SharePoint Online
|
Yes
|
Yes
|
1. Using CRM List Component (Client based integration)
As shown in the above
table this is the only integration method available for on-premise SharePoint
environments as they do not support server based integration. However it is
possible to use this option with both CRM on-premise and CRM online. This is
offered as a SharePoint solution which you need install in a SharePoint site
collection,
You can download the
Dynamics CRM 2013 List Component for SharePoint 2010 and SharePoint 2013 from here.
Here is an
installation guide - Install the Microsoft Dynamics CRM List Component
2. Using Server – based integration
Server based
integration can only be used with SharePoint online. It can be used to connect
to either on-premise on online CRM. This method uses Dynamics CRM Server to
SharePoint Server (server-to-server) authentication so there is no need to
install any additional components.
Before you move to
server-based SharePoint integration, review this article - Important
considerations for server-based SharePoint integration to see
some of the differences you’ll experience between client-based versus
server-based SharePoint integration.
Here is a detailed
configuration guide - Integration Guide: Microsoft Dynamics CRM Online and Office 365 .
Creation of Libraries and Folders
There are 2 options to
create document libraries and folders. Automatic folder creation andmanual
folder creation. The above guide explains the steps of automatic folder
creation. It makes it very easy for the users to manage documents in the
automatic folder creation option. However there is a limitation of that option
since it creates all the folders within the same document library. So this
option may not be practical if there are lot of documents to be uploaded which
requires a distributed folder hierarchy with multiple libraries. Most
importantly it would be better to go for multiple document libraries in order
to enforce better security. As an example here is my preferred hierarchy for a
typical sales management scenario.
- Level 1 – Document libraries
based on Accounts.
- Level 2 – Under each document
library multiple folders based on opportunities.
- Level 3 (optional) – Under each
opportunity folder, multiple sub folders based on functions such as sales,
legal, technical etc…
Now
lets look at how to configure manual folder creation according to the above
example.
Step 1 : Configure SharePoint Site
1.
Create a new site in SharePoint. I prefer to use a dedicated site collection.
2.
In CRM go to Settings –> Document Management –> Document management
settings. Select the entities to which you need to enable document management.
Leave the auto folder creation URL blank. Click Next and then Finish,

3.
In CRM go to Settings –> Document Management –> SharePoint Sites. This is
where we need to specify what the SharePoint site is. Click “New” which will
open “New SharePoint site” dialog. Give a name to the site (Ideally the same
SharePoint site name) and the URL of your SharePoint site. Click Save and close.
Under “My active SharePoint sites” now select your site and click Activate.
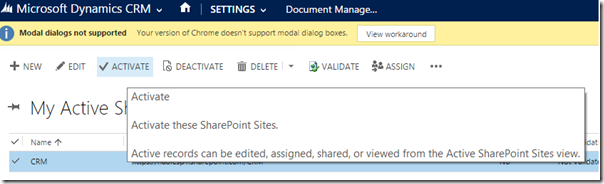
Once
activated click the Validate button so CRM can validate the URL of the selected
site.
Step 2 : Connect Document Libraries with CRM
Accounts
1.
Now we have to specify the document libraries based on the required hierarchy.
(According to the above example we need to create a document library for each
account.). Create a document library in SharePoint for the selected Account and
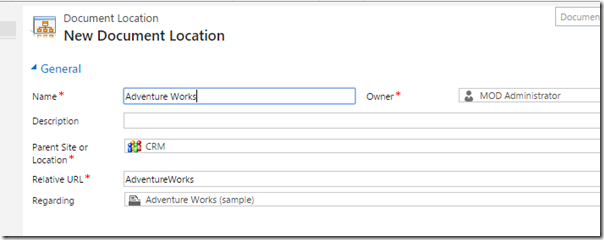
copy the URL. In CRM now go to Settings –> Document Management –>
SharePoint Document Locations. Click New, which will open the “New Document
Location” dialog. Give a name for the location (ideally the same document
library name). Under “Parent Site or location” select your SharePoint site.
(This should be automatically displayed as a result of previous step)
Now in the relative
URL paste the document library URL and edit it so that it will be relative to
the selected SharePoint site.
Now go to the
“Regarding” text box. click the search button. This will show you the CRM
accounts from which you can select the relevant account. If it is not showing
the relevant account or if it is showing some other entities such as
opportunities then click “Look up more records”. This will show you a search
dialog from which you can select the relevant record. Once selected click save.
Now the linked
document library will be displayed under “My active document locations”

2. Now go to the
relevant Account in CRM. When you click “Documents” it will show the mapped
SharePoint document location,

From here you can now
directly upload documents which will be then saved in to the SharePoint
document library. Also by clicking “Open SharePoint” you can open the document
library in SharePoint.
Step 3 : Connect Folders with Opportunities
1. Now that we have a
document library mapped to the CRM Account lets see how we can allocate sub
folders for Opportunities under that Account. First create an opportunity in
CRM for the selected Account.
2. Then go to Settings
– > Document Management – > SharePoint document locations, Click New.
Give a name to the document location
3. Click the search
button under the “Parent Site or location”. Now this should display 2 options,
the main SharePoint site and the document library which we earlier linked to
the Account. Select the document library.
4. Under Relative URL,
specify the folder name which you need to create in the document library,
5. Under “regarding”
select “look up more records” Then “Look for” opportunity. Select the relevant
opportunity and click Add. Click Save & Close.
.png)
Now you should see 2
records under my Active Document Locations.
6. Now open the
relevant opportunity. Click Documents. Now under “SharePoint Document
Associated View” it will say the folder cannot be found. It seems this is a bug
and we need to save it again.
7. Click Edit
location. Now as you can see all the settings are correct. But the Save button
is disabled. Until we do some change this will be disabled. So just click on
the display name and then space bar. This will enable the save button. Click
Save and confirm.
.png)
This will create the
relevant folder in the document library. Now if you click Documents option in
the relevant opportunity you can see that the folder is now attached to the
opportunity properly.
As you can see it is
not very user friendly to manually link libraries and folders to Accounts and
Opportunities. However if you want a proper hierarchy with multiple libraries
this is the option available unless you go for a 3rd party or a custom solution
Irrespective of the
method you use, there is a major problem in integrating Dynamics CRM with
SharePoint. The two applications maintain their own authorization systems so we
need to manage user permissions separately. That is we need to manually
configure user permissions required for SharePoint document libraries and CRM
records separately. This also need to be handled by a custom or 3rd party
solution.
Sources
Important
considerations for server-based SharePoint integration